|
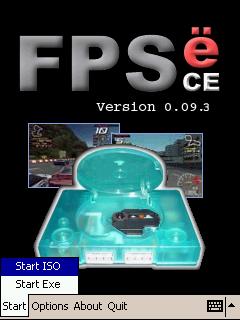
Foreword
System Requirements
Installation & Setup
Options
Emulation
PocketISO
Contact
Closing |
|
Foreword |
|
|
FpseCE is DonateWare, If you like it and want to
motivate us to continue our project, (like a much faster
emu, better compatibility, and the 0.10 core) then please visit our homepage and consider
making a donation to authors. We are doing this
otherwise for _free_ and spend a lot of time on this. As
you can see we need to be motivated!
Ported from 'Fpse' by LDchen and the 'Fpse Team'
http://it.geocities.com/fpseemulator
Programmers : Ludovic Olivencia and LDchen
Graphics : CharlyV, Laurent Poupon and Honolulu
This emulator is distributed in the hope that you may
find it useful, but carries no guarantees or warranties. |
|
System
Requirements |
|
|
|
Any Pocket PC running PocketPC2003
(Windows Mobile 2003), or Windows Mobile 2003 SE.
The ASUS A620 is used by the authors and is recommended for good performance
As much free ram as you can allocate, the more the
better. A minimum of at least 16MB is recommended. |
|
Installation &
Setup |
|
|
| 1. |
Choose the correct version for
your Pocket PC. The PocketPC2003 file is only
for Xscale based PocketPCs. An older PocketPC
2002 version should work for all other types. |
| 2. |
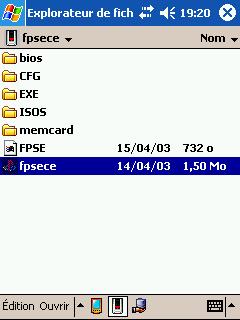 Extract the FpseCE0.09.3.zip and
copy the FpseCE directory anywhere in your
PocketPC. Extract the FpseCE0.09.3.zip and
copy the FpseCE directory anywhere in your
PocketPC. |
| 3. |
Put your Bios (i.e
scph1001.bin) in your FpseCE\BIOS directory.
(This is necessary to get emulator to work)
FpseCE should support all PSX Bios files with
.bin extension. SCPH1001 however is reccommened
to get the best performance and compatability. |
| 4. |
You may put your Isos in the
FpseCE\ISOS directory or anywhere else on your
PocketPC.
FpseCE supports only the following isos
formats :
*.iso (2352 bytes/sectors only)
*.img (from cloneCD)
*.bin (CDR Win, etc.)
*.Z, *.BZ (A compressed image generated by the
PocketISO tool)
*.ZNX (A compressed image generated by the
PocketISO tool)
!PLEASE NOTE! If you have compressed your
image file with PocketISO (available on our
homepage),
be sure to copy both the '.Z'(or '.BZ') file and
the '.table' file into the same directory on
your PocketPC.
If you have any Psx Executables (Demos and
homebrews mostly) place them into the
FpseCE\EXE directory on your PocketPC.
FpseCE supports the following psx EXE formats:
*.psx |
| 5. |
Once everything is set and
ready, start FpseCE. |
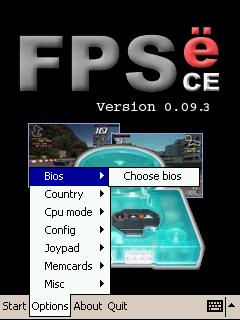
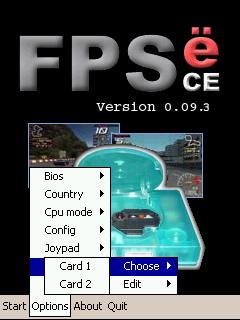
| 6. |
First you will need to setup
the BIOS. Go to "Options > Bios > Choose" to
select a BIOS stored previously in FpseCE\BIOS
directory. |
| 7. |
You can choose your memory
cards by selecting "Options > Memcards > Choose
> Card x" menu. |
| 8. |
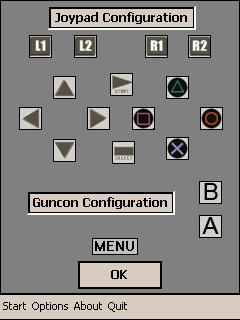
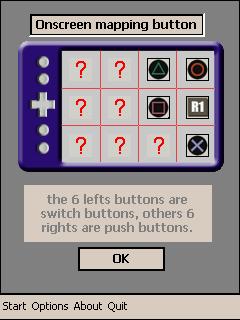
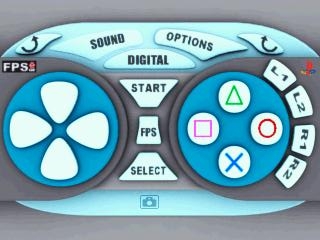
Next setup your buttons by
selecting "Options > Joypad > Assign buttons".
Setup the buttons however you like, but keep in
mind that the "MENU" button must be bound to a
button. You can also setup the onscreen buttons
at this time if you like. The 6 buttons of the
left are "sticky" buttons. Once pressed they
stay down until pressed again. The 6 buttons on
the right side are regular push buttons. To
change the button click on it, this will scroll
through the available buttons that you can bind
to this area. |
| 9. |
After all of this has been
done, you should be ready to start emulation. |
|
|
Options |
|
|
|
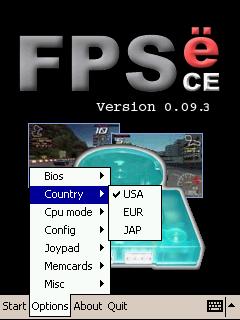
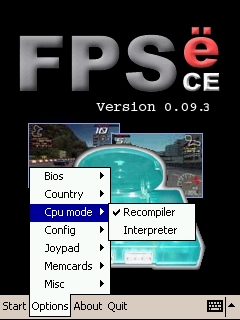
Open up the options menu to change other various
settings:
|
|
Emulation |
|
|
|
Just select "Start > Start ISO" and choose any ISOS
previously stored on your Pocket PC. If you press CANCEL
or OK without selecting any file, the emulator will boot
the BIOS, the memory card manager and CD player.
You can also open any PSX EXE file. To do this
select "Start > Start EXE" and choose any Psx Exe
previously stored on your
Pocket PC.
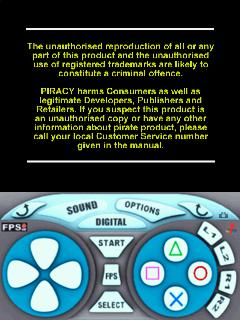
You can activate the on screen controller by pressing
the previously assigned 'Menu' button while in landscape
mode, portrait will have the controller on the screen by
default.
With the controller you can...
-
Exit
current emulation by tapping the button 'OPTIONS'
this will return you to the main menu.
-
Enable
/ Disable Sound
-
Press
any joypad button, useful for pressing any buttons
not currently assigned.
-
Take a
screen shot using the 'Camera' button (snapshot is
saved in .bmp format in FpseCE folder)
-
Switch
between analog and digital mode by pressing the
Digital/Analog button.
-
Turn
the FPS counter on and off. The FPS counter, while
more accurate in this version, does consume extra
CPU cycles. To keep emulation speed as fast as
possible leave this option off while playing.
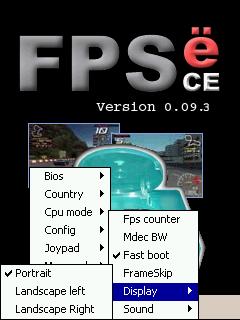
-
Rotate
the screen between portrait and landscape modes.
Press the looping arrow buttons to change this.
-
If in
landscape mode, press the menu button again to
return to the game.
-
Resize/move the graphic window in portrait mode. To
do this, press the 'Menu' button while in portrait
mode. then with your stylus you can drag the edge of
the rendered image to resize it, or drag in the
center of it move it. Press the 'Menu' button again
once you are finished.
-
Enter the 'Options' menu
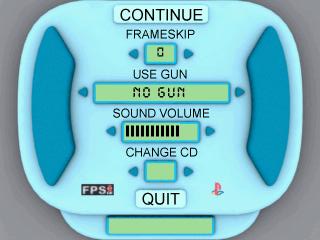
With the 'Options' menu you can...
-
Exit
current emulation by tapping the button 'QUIT' this
will return you to the main menu.
-
Continue current emulation by tapping the button
'CONTINUE' this will return you to game.
-
Select
level of Frame Skip, choose from 0 to 6. Frameskip
1,3,5 are Accurate frameskip, and frameskip 2,4,6
are fast frameskip which is faster and in general
smoother than accurate frameskip but some GFX
problems can occur using it.
-
Choose
GunCon type (Only Namco currently works)
-
Adjust
sound volume levels
-
Change
CD: for game using multi cd, you have to name them
like that: NameGame1.bin NameGame2.bin etc....
|
|
PocketISO |
|
|
For PocketISO 2.0 here is what's new:
Standard Video can be ripped now, so if you
choose .ZNX format, you have just to load your ISO
and choose "Rip video", then all is done. The XA
sector and all standard videos are ripped while ISO
is compressed! (Videos can be ripped in any
compressed format)
PocketISO will compress these formats
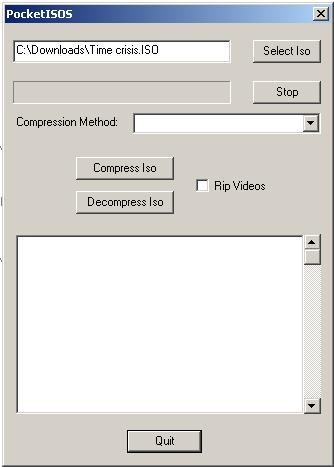
To use PocketISO...
-
Choose 'Select ISO'
-
Choose Compression method (.z, .bz,
or .znx)
-
Select checkbox to 'Rip Videos'
-
Select 'Compress Iso'
-
Make sure to copy both files it
creates to your FpseCE 'ISO' folder
Note: .z gives fast compression, .bz gives best compression but may slow down emulation slightly and .znx is the same as z but rips xa files while preserving the headers. Preserving the headers may allow the emu to run faster when xa files are played in the game.
|
|
Closing |
|
|
-= Ludovic 'schtruck' Olivencia and LDChen =-
English readme reformated, rewritten, and updated for
.09.15 by TheDragonKeeperEnglish readme reformated,
rewritten, and updated for0.09.3 by GSC
Some reformatting done by Pincman.
Additional misc editing and help by Megatron and almighty bob |
|